Creating a notification action
To create a notification action in Omnipeek:
1. On the menu, click …. The Options dialog appears.
NOTE: To create notifications from a Capture Engine, open the Capture Engines window and connect to a Capture Engine.
2. Click the Notifications options. (For a Capture Engine, select the Notifications tab.)
3. Click . The Insert Action dialog appears.
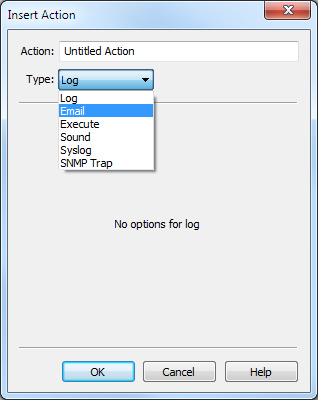
4. In the Action box, type a name for the new action.
5. In the Type list, select the type of action. You can select from the following:
• Log: This action sends the notification to the log file.
• Email: This action sends notifications as email messages. The text of the notification is included in the body of the message. When selected, you will need to configure the following:
• Recipient: Type the email address of the recipient.
• Sender: Type the email address of the sender.
• SMTP Server: Type the SMTP server for the sender email.
• Port: Type the port for the sender email.
• Send Test Email: Click to send a test email.
• Execute: This action lets you run a program that you specify. When selected, you will need to configure the following:
• Command: Type or browse to the location of the executable file.
• Argument: Enter any arguments for the command.
• Initial dir.: Type or browse to the location of the initial directory.
• Text Log: (Capture Engine only) This action lets you write the notification to a text file stored in the Capture Engine data folder. The data folder is configured in the General view of the Capture Engine Configuration Wizard. (See the Capture Engine for Omnipeek Getting Started Guide for details.)
• Sound: (Omnipeek only) This action lets you play an audio *.wav file. When selected, you will need to configure the following:
• Play Sound: Type or browse to the *.wav file.
• Test Sound: Click to play the *.wav file.
• Syslog: This action sends a syslog message. The text of the notification is included in the body of the message. When selected, you will need to configure the following:
• Recipient: Type the IP address of the syslog server.
• SNMP Trap: This action sends notifications as SNMP trap messages. The text of the notification is included in the body of the message. When selected, you will need to configure the following:
• Recipient: Type the IP address of the SNMP server.
• Community: Type the community for the recipient.
NOTE: The MIBs directory contains the MIB file that supports the SNMP Trap action in notifications. In a typical default installation, this directory is at C:\Program Files\LiveAction\Omnipeek\MIBs.
NOTE: For Capture Engines, the source for a notification must also be specified. See Sources of Capture Engine notifications.
6. Click . The new action is added to the Notifications view.
NOTE: For Capture Engines, you must also click the yellow bar above the list of actions in order to send the changes to the Capture Engine.
7. For the new action, select the level of severity check box that will start the action whenever the level of severity is generated by the program. See Configuring notifications.
8. Click .